
Photo credit: Wes Tindel
** I put a race car on the cover because I believe in speed. Fast UI, optimized forms, and zero lag. Or maybe I just liked the picture. Who’s to say? 🤷🏽♂️
Table of Contents 📜
- A Small Rant
- What is React Hook Form?
- Installation
- The useForm Hook
- What's Going On?
- The Secret Sauce Behind
register(...) - Tying it All Together
A Small Rant
At first, it’s just a couple of inputs--no big deal. You sprinkle some useState here and some handleChange function there, and boom! You’ve got yourself a working form. But then, the form grows. More fields. More state. Before you know it you’re manually handling a bunch of validation logic, tracking every keystroke like a detective, and somehow, wondering how you’ve got a headache from trying to implement a form. 😭💔
How about validation? Some new level of chaos. You write a function to check if an email is valid, another to ensure passwords are strong, and yet another to ensure that no user enters 123 as their first name. Now, you manage to overcome the previous struggles and get to write code for capturing validation errors and displaying them, ‘If this field is empty, display this error. If it is not filled correctly, show that error’.
By the time you’ve written validation, error handling and submission logic, your form is rerendering so much it might as well have its own loading screen. Because of these extra renders, performance may be compromised for complex forms. Imagine doing all these for a complex form-one with dropdowns, check boxes, date pickers etc. At this point, your form isn’t just a form--it’s a full time job, and suddenly, you’re questioning your life choices. 😪
Forms are actually supposed to be simple, but managing them all by yourself in React can feel like assembling new equipment without the manual. But there’s good news, React Hook Form is here to save the day-no more unnecessary state management or rerenders, or wrestling with validation logic. Just smooth easy form handling.
What is React Hook Form?
React Hook Form is a library that simplifies form handling in React. It handles form state efficiently, reduces unnecessary re-renders, and makes validation seamless. According to the documentation, it's performant, flexible, and allows you create extensible forms with easy-to-use validation. 💯
Installation
Get started by installing the library using your favorite package manager. I'd be using npm for this guide.
npm install react-hook-form
The useForm Hook
Meet the useForm hook-your new best friend in form management. The useForm hook is the main hook in React Hook Form. It's used to create a form instance and manage form state. It does all the heavy lifting for you by:
- automatically tracking the fields in your form. This means you don’t have to track the values of your field with
useStateas they change. - handling validation like a pro. Just define rules, and the errors appear when they need to. No more setting form error messages manually.
- making submission easier. It provides a submit function out of the box that doesn’t submit until all validation logic has passed. And of course, no more
e.preventDefault()like its 2015. 🙄
Enough talking. Let’s write some code! 💻
Import the useForm hook from the library.
import { useForm } from "react-hook-form";
Create a component called SimpleEmailForm. Then like a regular React hook, call the useForm hook at the top level of your component, and destructure the form instance.
const {
  register,
  handleSubmit,
  formState: { errors },
} = useForm();
Next, let's create a submit handler function. This is where you'll handle the form data once it's submitted. For now, let's just log the data to the console.
const onSubmit = (data) => {
  console.log("Form submitted with data:", data);
};
Registering Inputs
In React Hook Form, every input is registered with the register function. This function takes a name and returns a reference to the input. Here's is a very basic example.
<input {...register("email")} />
Let's render the complete JSX for now, we'd come back to the register function later.
<form onSubmit={handleSubmit(onSubmit)}>
  <input
    {...register("email", {
      required: "Email is required",
      pattern: {
        value: /^[A-Z0-9._%+-]+@[A-Z0-9.-]+\.[A-Z]{2,}$/i,
        message: "Invalid email address",
      },
    })}
  />
  {errors.email && <p>{errors.email.message}</p>}
  <button type="submit">Submit</button>
</form>
Boom! You have created a basic form with React Hook Form and an email input with some validation.
Here's how your code should look like so far.
import { useForm } from "react-hook-form";

const SimpleEmailForm = () => {
  const {
    register,
    handleSubmit,
    formState: { errors },
  } = useForm();

  const onSubmit = (data) => console.log("Form submitted:", data);

  return (
    <form onSubmit={handleSubmit(onSubmit)}>
      <input
        {...register("email", {
          required: "Email is required",
          pattern: {
            value: /^[A-Z0-9._%+-]+@[A-Z0-9.-]+\.[A-Z]{2,}$/i,
            message: "Invalid email address",
          },
        })}
      />
      {errors.email && <p>{errors.email.message}</p>}

      <button type="submit">Submit</button>
    </form>
  );
};
What's Going On? 🕵🏿
I know. All of this syntax is new to you😅. Let’s break it down step by step. At the top of our component, you invoked the useForm hook and got some properties from it:
register: this is simply a method returned by the useForm hook that lets you register an input and apply validation rules to it.handleSubmit: is a special handler from React hook form that intercepts the form submission, validates the field and only calls our onSubmit function if the checks are successful.formState: this object contains tons of useful information about the entire state of your form. For now we are focusing on the errors object which helps us retrieve error messages easily. Without this, you would have to manually write logic for storing and updating form errors.
Next, you wrote the onSubmit function which is responsible for submitting the data from the form. This is where you normally would send the data to the database or make an API call with. No strange syntax here. 😊
Why onSubmit={handleSubmit(onSubmit)}?
At first glace, I'm sure you must be wondering what magic 🧙🏽♂️ is being conjured here:
<form onSubmit={handleSubmit(onSubmit)}>
An onSubmit inside a handleSubmit, wrapped inside another onSubmit. What’s going on here?
Well, there’s actually a good reason for this. Let’s demystify! 🤗
onSubmit(from the form tag): this is your standard HTML form submission event, remember? Like onClick, onHover etc. Nothing new here.handleSubmit(from React Hook Form): now this is something new. This is React Hook Form’s special handler. Right after you submit your form, this handler swings into action by intercepting the form submission, ensures that the form data passes whatever validation rules you have written, and only calls your actual submit function when there are no validation errors. How sweet!onSubmit(our custom function): this is the function you would normally write to process your data-sending it to a backend, or whatever you wish to do with it.
So to briefly summarize, handleSubmit is like a party bouncer. It only lets valid data get sent to your custom onSubmit function. And plus, you don’t have to manually write e.preventDefault() to prevent the page from reloading.
Without handleSubmit, we would have to manually check if every field got the right data, store any error messages in state, and deal with unnecessary rerenders. With RHF, validation happens first, and only valid submissions get processed-saving us time and effort!
The
handleSubmitfunction is a special function that intercepts the form submission, validates the field and only calls ouronSubmitfunction if the checks are successful.
Without handleSubmit, we would have to manually check if every field got the right data, store any error messages in state, and deal with unnecessary rerenders. With RHF, validation happens first, and only valid submissions get processed-saving us time and effort! Here's how you might write the same form without RHF:
export default function FormWithoutRHF() {
  const [email, setEmail] = useState("");
  const [error, setError] = useState("");

  const handleChange = (e) => setEmail(e.target.value);

  const handleSubmit = (e) => {
    e.preventDefault();
    if (!email) {
      setError("Email is required");
    } else {
      setError("");
      console.log(email);
    }
  };

  return (
    <form onSubmit={handleSubmit}>
      <input value={email} onChange={handleChange} />
      {error && <p>{error}</p>}
      <button type="submit">Submit</button>
    </form>
  );
}
That’s a lot for just one input field. Imagine doing this for more than 10 inputs. With RHF, we turn all that to this:
<input {...register("email", { required: "Email is required" })} />;
{
  errors.email && <p>{errors.email?.message}</p>;
}
This way, we don’t have to worry about how the validation errors would be tracked and updated. RHF does all these under the hood.
If you're using React Hook Form with TypeScript, you might run into this error when trying to display validation messages:
Type 'string | FieldError | Merge<FieldError, FieldErrorsImpl<any>> | undefined' is not assignable to type 'ReactNode'.
This is because errors.email.message is not always a string. It can be a object in some cases, which TypeScript doesn't allow directly inside JSX. 🚫
To fix this, you can cast the error message to a string like this:
{
  errors.email && <p>{errors.email.message as string}</p>;
}
You can log the error message to the console to see what it looks like:
console.log(errors);
This will give you an object with the error message. You can then access the message from the object. For example:
console.log(errors.email.message);
This will give you the error message. You can then display it in your component.
{
  errors.email && <p>{errors.email.message as string}</p>;
}
Now try submitting the form without filling the email field. You should see the error message.
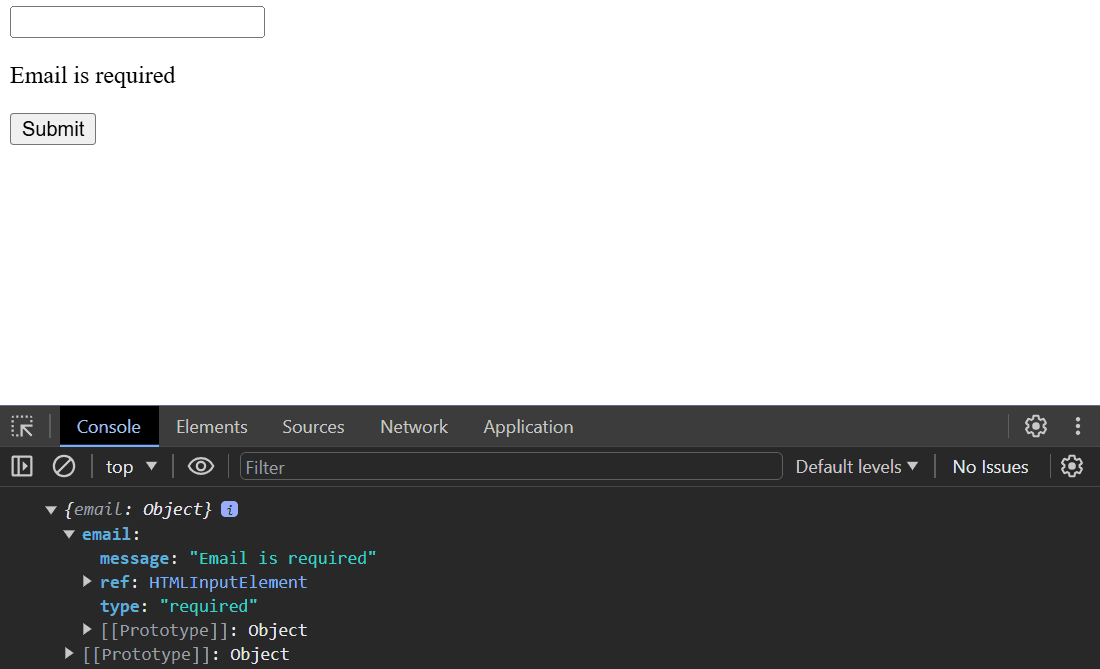
If you type in the email field and submit the form, you should see the error message disappear. Even before you submit the form, the error message disappears when you start typing in the email field. On every keystroke, the onChange event is triggered and the error message is updated.
For an email field, a required validation is not enough. We also need to validate the email format. You can do this by adding a pattern validation rule. The pattern validation rule takes a regular expression as a value. The regular expression is used to validate the email format. If the email does not match the regular expression, the validation will fail and the error message will be displayed.
<input
  {...register("email", {
    required: "Email is required",
    pattern: {
      value: /^[A-Z0-9._%+-]+@[A-Z0-9.-]+\.[A-Z]{2,}$/i,
      message: "Invalid email address",
    },
  })}
/>
Don't worry about the regular expression. It's a standard email validation regex. You can read more about it here. You may not really need to use this regex, there are simpleer ways to validate an email using validation libraries like Zod, but that's for another post.
Now, try inputting an invalid email address. You should see the error message.
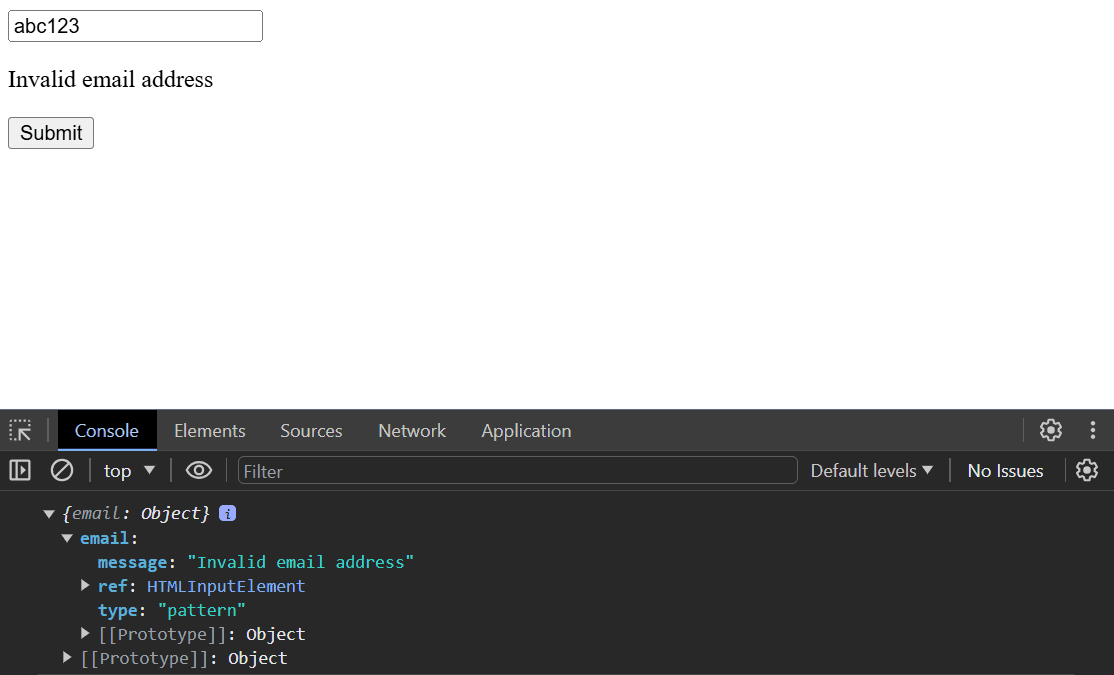
Notice how React Hook Form knows which error message to display based on the validation rule that failed. If we were to handle this manually, we would have to write a lot of code to achieve this. Like this:
const [emailError, setEmailError] = useState("");
const [email, setEmail] = useState("");

const handleEmailChange = (e) => {
  const email = e.target.value;
  setEmail(email);
  if (!email) {
    // Check if the email field is empty
    setEmailError("Email is required");
  } else if (!email.match(/^[A-Z0-9._%+-]+@[A-Z0-9.-]+\.[A-Z]{2,}$/i)) {
    // Check if the email is valid
    setEmailError("Invalid email address");
  } else {
    // If the email is valid, clear the error message
    setEmailError("");
  }
};

return (
  <form>
    <input value={email} onChange={handleEmailChange} />
    {emailError && <p>{emailError}</p>}
    <button type="submit">Submit</button>
  </form>
);
Here, we have to manually check if the email field is empty or if the email is invalid. We also have to manually update the error message. Phew! 😤
With React Hook Form, we don't have to do any of that. We just define the validation rules and the appropriate error message is displayed automatically. 🥳
Here's how the code would look if you were to add more validation rules to the email field:
<input
  {...register("email", {
    required: "Email is required",
    pattern: {
      value: /^[A-Z0-9._%+-]+@[A-Z0-9.-]+\.[A-Z]{2,}$/i,
      message: "Invalid email address",
    },
    minLength: {
      value: 5,
      message: "Email must be at least 5 characters",
    },
    maxLength: {
      value: 100,
      message: "Email must be less than 100 characters",
    },
  })}
/>
To see the other validation rules React Hook Form supports, you can read about them here in the documentation.
There’s one more thing we haven’t really talked about. 👀
The Secret Sauce behind register(...) 🍾
** Note that for simplicity, I didn't include the pattern validation rule in the example above. You can add it just like the other validation rules.
So what’s this all about:
<input {...register("email", { required: "Email is required" })} />
Let’s break down our code again.
register(name: string, options?: RegisterOptions): Like I described earlier, this is a method returned by the useForm hook. By doing this, we’re saying: “Hey, track this field called email”. It takes two parameters, a string, and an optional options object. The first parameter describes the input’s name, and the second describes the input’s behaviour.- The options object
{ required: "Email is required" }is where you would define all the validation rules, that is, how the input behaves. You can add other basic validation rules from HTML min, max, minLength, maxLength, pattern, and validate.
As an example, to register first name, age, password and a checkbox field, you would do something like this:
<form onSubmit={handleSubmit(onSubmit)}>
  <input {...register("firstName", { required: true, maxLength: 20 })} />

  <input type="number" {...register("age", { min: 18, max: 99 })} />

  <input
    type="password"
    {...register("password", { required: true, minLength: 6 })}
  />

  <label>
    <input type="checkbox" {...register("terms", { required: true })} />I agree
    to the terms and conditions
  </label>

  <button type="submit">Submit</button>
</form>
This code registers:
- A first name field which must be filled and has a maximum length of 20
- An age field that must be between 18 and 99
- A password field that ensures that the user provides at least 6 characters
- And a checkbox that mandates the user to agree before submitting
What’s Really Inside register()?
This register function exposes the values of all the inputs to the useForm hook for form validation and submission. When you call register(‘firstname’), it’s not just a magic function-it’s actually returning a set of useful props that React Hook Form uses to track the input field. Instead of spreading these props directly inside the input like this:
<input {...register("email", { required: "Email is required" })} />
You can destructure them manually like this:
// Destructure the props
const { onChange, onBlur, name, ref } = register("email", {
  required: "Email is required",
});

// Use the props directly in the input
<input
  onChange={onChange} // assign onChange event
  onBlur={onBlur} // assign onBlur event
  name={name} // assign name prop
  ref={ref} // assign ref prop
/>;
The register function returns an object containing:
onChange: which updates the form state when the input value changesonBlur: which triggers validation when the input loses focusname: which assigns the field nameref: which connects the input to RHF for tracking
The shorthand {...register("firstName", {...rules})} is just a more compact and cleaner way to apply everything at once, rather than assign each prop manually. Both methods work the same way but the shorthand keeps things DRY. I just needed to show you the second approach to help you understand what’s going on under the hood.
Tying it All Together 🎀
Form management in React doesn’t have to be a headache, trust me! Instead of drowning in manually tracking errors, and wondering what’s causing your form to rerender, React Hook Form gives us a cleaner, simpler, and more efficient way to handle forms.
Here’s what we covered:
- ✅ Why form management in React can be tricky
- ✅ How useForm simplifies state management and validation
- ✅ Understanding what handleSubmit, register is doing under the hood
- ✅ A variety of real world input fields with native HTML validation
At the end of the day, RHF takes the heavy lifting off our shoulders, letting us focus on building great experiences instead of debugging form logic.
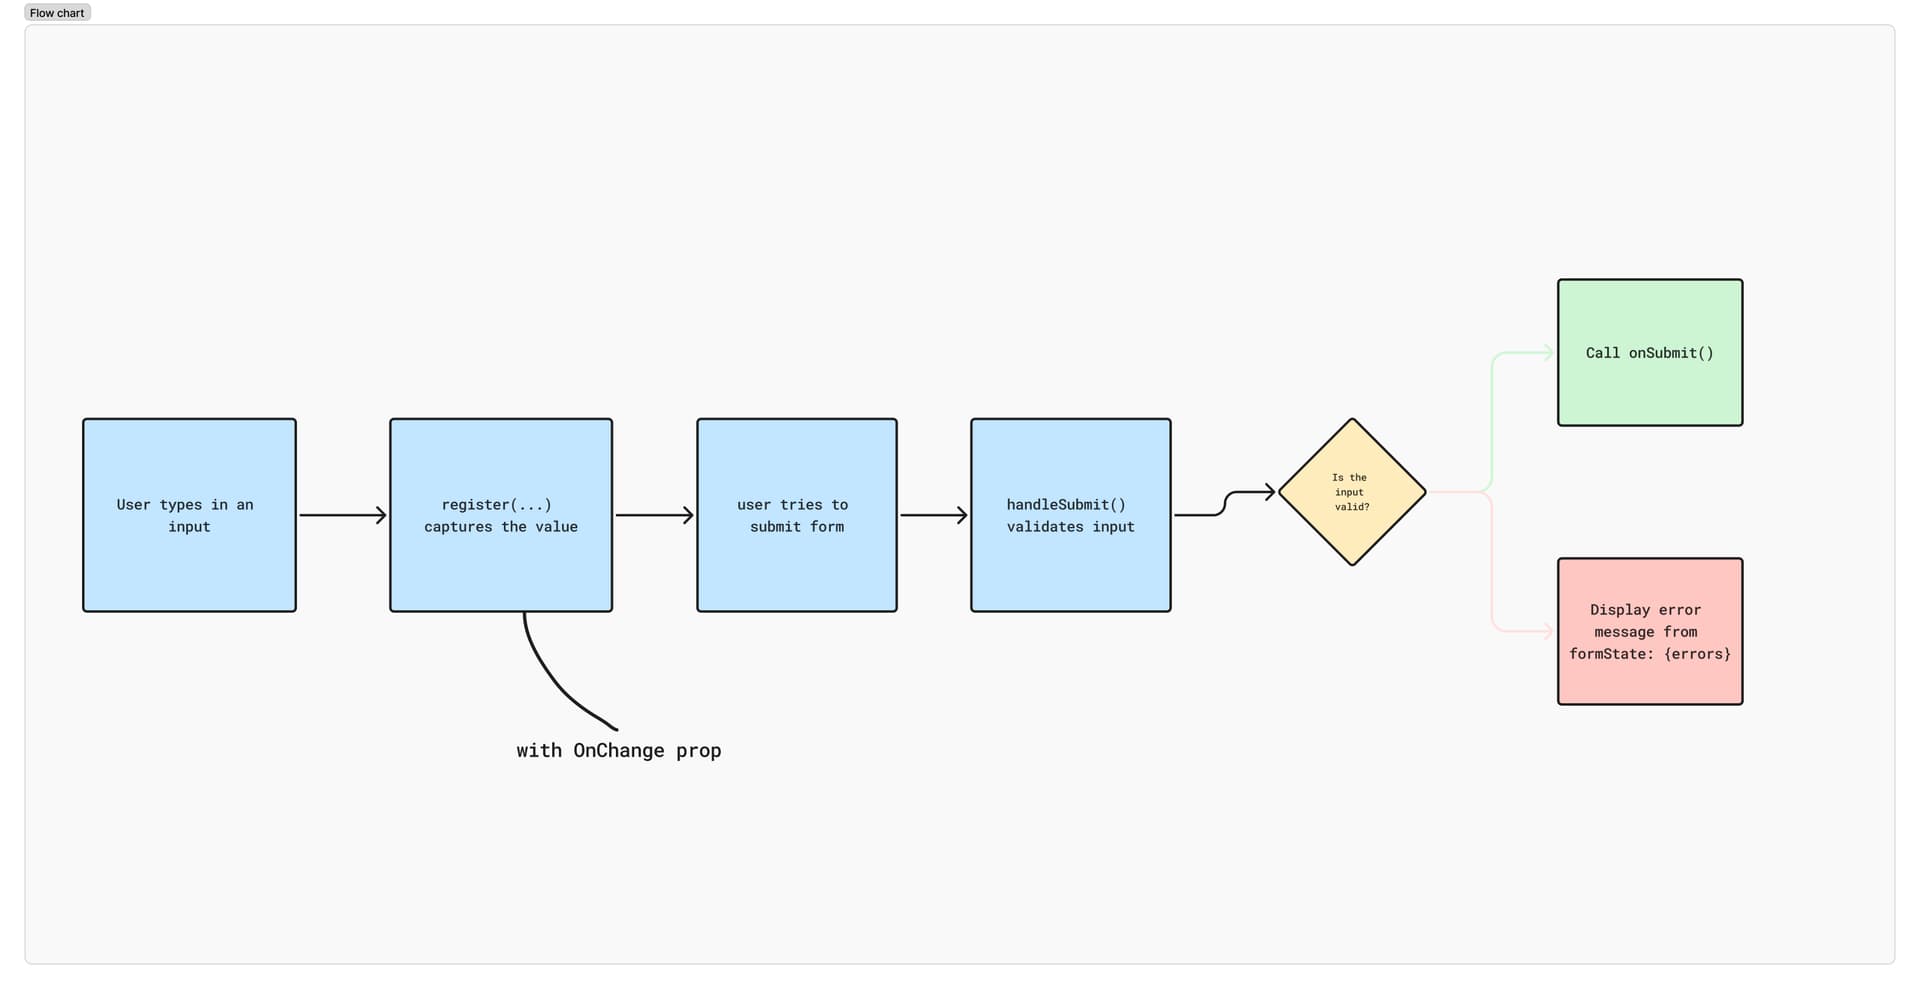
Here’s a visual overview that might help appreciate everything we’ve discussed:
Thanks for reading! May your forms be smooth, your errors be few, and your re-renders be minimal. 🥂
See you in the next one!
Share this post 💌
If you enjoyed this post, it would mean a lot to me if you could share it with your friends.